Under Stair Storage: Built-Ins That Fit the Slope
The wedge under a stair is one of the most wasted volumes in a house, and under stair storage only works when the design follows the slope instead of fighting it. Custom cabinets, stepped shelves, and pull-outs reclaim coats, pantry overflow, luggage, and household gear without turning the niche into a dark pile of boxes. Our team measures depth changes, plans access so daily items stay easy to reach, and builds around mechanicals and safety clearances so the space stays useful for years, not just for one tidy photo.
Why the under-stair niche feels awkward (and why it is still valuable)
Most stairs rise in a steady geometry. Model residential codes used across much of the United States set familiar limits: maximum riser height of 7-3/4 inches, minimum tread depth of 10 inches, and minimum headroom of 6 feet 8 inches along the stair, among other rules for width, landings, and handrails.[1] Those numbers create a predictable triangle under the flight. Height grows step by step from a shallow toe zone near the lowest risers to a near-full-height zone under the upper landing.
That slope is the reason generic freestanding shelves fail. A single deep cabinet depth leaves either empty air at the tall end or a dead zone at the low end that you can fill only by crawling. Boxes stack, then they block each other. Coats hang where you cannot reach hangers without a flashlight. The volume is real, but the access path is wrong.
Under stair storage earns its keep when we map three things first:
- Clear interior height at several stations along the stringer, not only at the tallest corner.
- Door and pull-out swing so the stair side of the hall or foyer still works for walking and furniture.
- What you actually retrieve weekly versus what can live deeper as seasonal overflow.
When those three align, the niche stops being a junk void and becomes a purpose-built pocket for entry gear, kitchen bulk, cleaning tools, or guest linens.
Design patterns that fit the slope
Stepped shelves and zoned heights
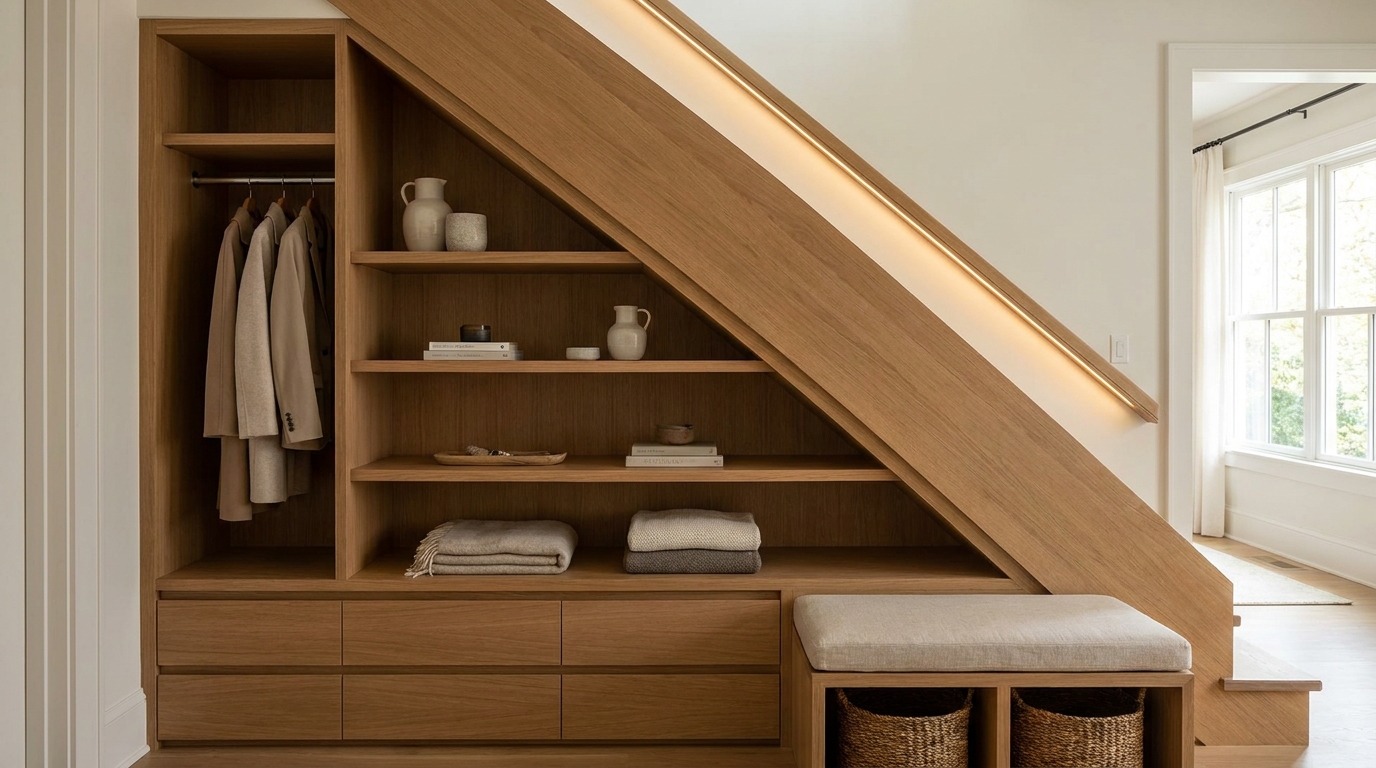
Stepped shelving follows the underside of the stair. Short bays at the low end hold shoes, bins, or canned goods. Mid-height bays take baskets and folded goods. Full-height zones take hanging rods, tall pantry cans, or upright vacuum storage. We often leave a few inches of air at the very top so dusting is simple and so nothing wedges against the stair structure.
Zoning by frequency matters as much as zoning by height. Utah State University Extension notes that clutter can feed stress and that starting small, with one manageable area at a time, is a practical way to regain control of a space.[2] Under-stair systems work best when the front row is reserved for items you touch often. Deep rear volume can hold holiday décor, luggage, or bulk paper goods, but only if those items have a labeled home and a clear path out.
Pull-outs, drawers, and rolling bases
Pull-out trays convert depth into reach. Instead of kneeling into a dark cavity, you roll the storage to you. Drawers work well for shoes, pet supplies, and small hardware. Full-extension slides on pantry-style trays suit bottles and boxed goods. At the lowest tip of the wedge, a shallow rolling bin or fixed toe-kick drawers can still capture volume that would otherwise be empty.
Hardware choice is not decorative fluff. Full-extension, quality slides keep heavy pantry loads stable. Soft-close reduces slam noise in foyer and living-adjacent locations. We size drawer heights to real products (tall cereal boxes, tall boots, mop handles) so you do not buy a pretty box that still does not fit the life you live.
Closed cabinets vs open display
Closed doors keep visual calm in open foyers and main halls. Open cubbies suit mudroom-style habits where family members need speed more than concealment. Many homes want both: closed tall doors for bulk and coats, open cubbies near the entry for daily bags and shoes. Cabinet and shelf finishes should match adjacent trim or intentionally contrast as millwork so the niche reads as designed architecture, not a leftover closet afterthought.
Hanging, hooks, and coat capacity
If the tall zone is at least coat-length, a short rod or a row of sturdy hooks turns the space into a secondary entry closet. Hooks often outperform a full rod when the depth is limited, because coats can hang flatter against the back wall. A bench-height base with drawers under hooks gives a place to sit and store footwear, which is one of the most common day-to-day uses we see in Charlotte homes with busy front halls.
Layout tips for depth changes and daily access
Measure the wedge like a custom space, not a rectangle
We take heights every foot or so along the run, plus overall width, door rough openings, baseboard and trim thicknesses, and any bulkheads. We also note floor level changes and transitions from foyer tile to hardwood. Small floor steps can throw off drawer reveals if they are ignored.
Sketch the storage as bands:
- Toe zone: low, shallow, often best as drawers or a single deep bin.
- Mid zone: baskets, folded textiles, pantry overflow.
- Stand-up zone: hanging, tall cabinets, broom and vacuum storage.
That band model keeps under stair storage honest. You stop promising a full walk-in where only a kneeling cavity exists.
Keep the first 18 to 24 inches for “now” items
Whatever the total depth, plan the nearest tier for items used this week. Put overflow behind doors, on pull-outs, or on upper stepped shelves. If everything is equally deep and unlabeled, the niche reverts to a black hole within a month.
Labels and consistent bin sizes help more than another clever hinge. Extension guidance on decluttering emphasizes manageable, repeated action rather than a single heroic purge.[2] Built-ins support that habit when every category has a fixed address: shoes here, backpacks there, paper goods on the mid pull-out, seasonal bins only in the rear tall cabinet.
Door types that respect the hall
- Hinged cabinet doors are simple and familiar. Confirm they do not block the stair approach when open.
- Bypass or bi-fold faces reduce swing into narrow halls.
- Drawer fronts avoid a big door swing entirely in the lowest bays.
- Pocket doors into an under-stair room can work when framing allows, but they need clear wall cavities and careful hardware.
In tight foyers, we often prefer a mix: drawers at the low end, hinged doors only where the hall is wide enough, and pull-outs behind doors so you never have to crawl past a half-open panel while someone comes down the stairs.
Lighting and visibility
A dark wedge is half the usability problem. LED strip lights under shelves, a surface puck on a sensor switch, or a simple switched fixture inside a tall bay make contents visible. Light also helps you stop over-buying duplicates because you can see what you already own.
Safety and systems you should not bury
Custom storage should never hide required clearances or create a blocked exit path. Building and fire code language about stair enclosures is stricter in multi-unit and exit-stair conditions than in a typical single-family open stair, but the design habit is the same: respect the stair as a primary path, keep stored goods out of the walking line, and build finishes that are appropriate for the construction type.
Model code provisions for usable space under stairways address fire-resistance of walls and soffits around enclosed storage, and they limit how that space is accessed in exit-stair settings. Residential exceptions exist for spaces under stairs that serve and sit within a single dwelling unit, including lighter gypsum protection on the enclosed side in those dwelling-unit cases, but local adoption and project type still control what applies on a given job.[3] Our takeaway for homeowners is practical: treat under-stair built-ins as real construction, not temporary shelving, and confirm anything structural or rated with the right professional when the stair is part of a shared exit or multi-family condition.
Electrical panels and service equipment also appear under stairs more often than people expect. OSHA requires sufficient access and working space around electric equipment so it can be operated and maintained safely. Working space width in front of equipment is the width of the equipment or 30 inches, whichever is greater, with depth based on voltage and conditions in Table S-1, and headroom about panelboards generally not less than 6.5 feet for newer installations (or the equipment height if taller).[4] Industry explainers commonly summarize residential panel keep-clear zones as about 36 inches deep, 30 inches wide, and 78 inches high in front of the equipment, kept free of storage and cabinets.[5] If a panel lives in your under-stair area, we design around that clear box rather than covering it with pretty doors that would fail a future inspection or slow a repair.
Moisture, humidity, and what you should (and should not) store
Stair wedges often sit near exterior walls, crawlspace edges, or basement transitions. Moisture control is storage design, not a side note. The U.S. EPA recommends keeping indoor humidity below 60 percent relative humidity when possible, ideally between 30 and 50 percent, and notes that relative humidity can be checked with a simple meter.[6] University of Georgia Extension guidance for mold prevention aligns with that range: keep indoor humidity below 60 percent, ideally 30 to 50 percent, fix leaks, and use exhaust and dehumidification where dampness is common.[7]
What that means for under stair storage:
- Prefer sealed bins for paper, photos, and fabric if the niche runs cool or damp.
- Avoid packing cardboard against exterior concrete or poorly insulated exterior walls.
- Leave a little airflow at the back of deep cabinets rather than foam-packing every gap against a cold surface.
- Keep floor-level goods slightly elevated on drawer boxes or platforms if the area has ever shown condensation.
- Do not treat the niche as a second attic for paint cans, fuels, or other household chemicals that need dedicated, ventilated storage elsewhere.
Dry bulk foods and sealed pantry goods do well in pull-outs when humidity is controlled. Soft goods do better in closed cabinets with steady indoor conditions. If the space has a history of dampness, solve moisture first; furniture-grade cabinets will not fix a wet wall.
Matching under stair storage to real household jobs
Different homes ask different things of the same triangle:
Entry and coat overflow. Tall zone for hanging, mid drawers for gloves and dog leashes, low drawers for shoes. Ideal near front doors that lack a true mudroom.
Pantry overflow. Pull-out trays for cans and dry goods, door-mounted spice racks only if the door is full height, and clear bins so you can see inventory. Keep heavy glass jars on lower pull-outs.
Household gear. Vacuum, broom, step stool, light bulbs, batteries, and gift wrap. Tall narrow bays with vertical dividers beat a single deep dump shelf.
Kids and school. Backpack cubbies at standing height, a charge shelf with a grommet and outlet (installed to code by a qualified electrician), and a lower bin for sports shoes.
Guest readiness. Linens, extra pillows, and a small folding chair or stroller bay when the tall zone allows.
The best under stair storage plan starts with a short inventory, not a catalog photo. We walk the house with you, list what currently lives in the hall closet, garage, and kitchen overflow, then assign each category a height band and access type. That is how the niche stays used instead of re-cluttered.
How our team approaches the project
At The Closet Rehab, we treat under-stair work like any other custom space: measure carefully, design for the way your household actually moves, and install millwork that fits the architecture of the home. Our spaces work covers closets, pantries, and specialty niches, and the same planning habits apply when the ceiling slopes.
A typical process looks like this:
- On-site measure of the wedge, adjacent rooms, and any mechanicals.
- Use mapping so coats, pantry, or gear get the right zones.
- Layout options with stepped shelves, drawers, pull-outs, and doors that respect the hall.
- Finish selection that ties to nearby cabinetry or trim.
- Install and adjust so doors clear baseboards, drawers clear flooring, and lighting works.
If you want a clear walkthrough of what working with us looks like from first conversation to finished install, see how it works. When you are ready for a site visit in the Charlotte area, contact us and we will look at the niche with a tape measure and a realistic use plan, not just a product brochure.
Practical checklist before you build
Use this list whether you are planning with us or simply preparing questions:
- List weekly items vs seasonal items that might live under the stairs.
- Measure height every 12 inches along the slope, plus full width and depth.
- Note electrical panels, shutoffs, HVAC returns, and plumbing cleanouts.
- Confirm door swings against stair traffic and furniture paths.
- Decide closed storage vs open cubbies based on how tidy the foyer needs to look.
- Plan lighting and labels as part of the design, not as afterthoughts.
- Keep humidity in a healthy indoor range and choose storage methods that match moisture risk.[6][7]
- Keep required clear working space in front of any electrical equipment completely free of cabinets and storage.[4][5]
- Choose pull-outs for deep zones so you never have to crawl for everyday goods.
- Leave the walking line of the stair and hall clear; storage belongs in the niche, not on the steps.
Closing thought
Under stair storage succeeds when the design accepts the triangle. Stepped shelves, pull-outs, and mixed open and closed fronts turn an awkward leftover into daily-use capacity for coats, pantry overflow, and household gear. Geometry, access, moisture awareness, and safety clearances matter more than any single hardware trend. Build for the depth you truly have, put frequent items up front, and the wedge stops wasting square footage you already own.
Citations
[1] RedX / deck-stairs code guide summarizing IRC 2021 stair dimensions (R311), including max riser 7-3/4 in, min tread 10 in, and min headroom 6 ft 8 in: https://www.redxapps.com/guides/deck-stairs-code
[2] Utah State University Extension, “The Mental Health Benefits of Decluttering” (July 1, 2022): https://extension.usu.edu/mentalhealth/articles/the-mental-benefits-of-decluttering
[3] UpCodes code text for enclosures under stairways (fire-resistance of walls/soffits in enclosed usable spaces; residential dwelling-unit exception with 1/2-inch gypsum on the enclosed side): https://up.codes/s/enclosures-under-stairways
[4] OSHA 29 CFR 1910.303, electrical equipment working space and headroom requirements: https://www.osha.gov/laws-regs/regulations/standardnumber/1910/1910.303
[5] International Association of Certified Home Inspectors (CCPIA), “Safe Clearances for Electrical Equipment: Working Space and Dedicated Space” (36 in depth, 30 in width, 6.5 ft height framing of common clearances): https://ccpia.org/safe-clearances-for-electrical-equipment-working-space-and-dedicated-space/
[6] U.S. EPA, “A Brief Guide to Mold, Moisture and Your Home” (indoor humidity below 60%, ideally 30–50% RH): https://www.epa.gov/mold/brief-guide-mold-moisture-and-your-home
[7] University of Georgia Extension / CAES Field Report, “Preventing Mold in Your Home” (humidity guidance aligned with EPA; moisture control practices): https://fieldreport.caes.uga.edu/publications/C1047-1/preventing-mold-in-your-home/